
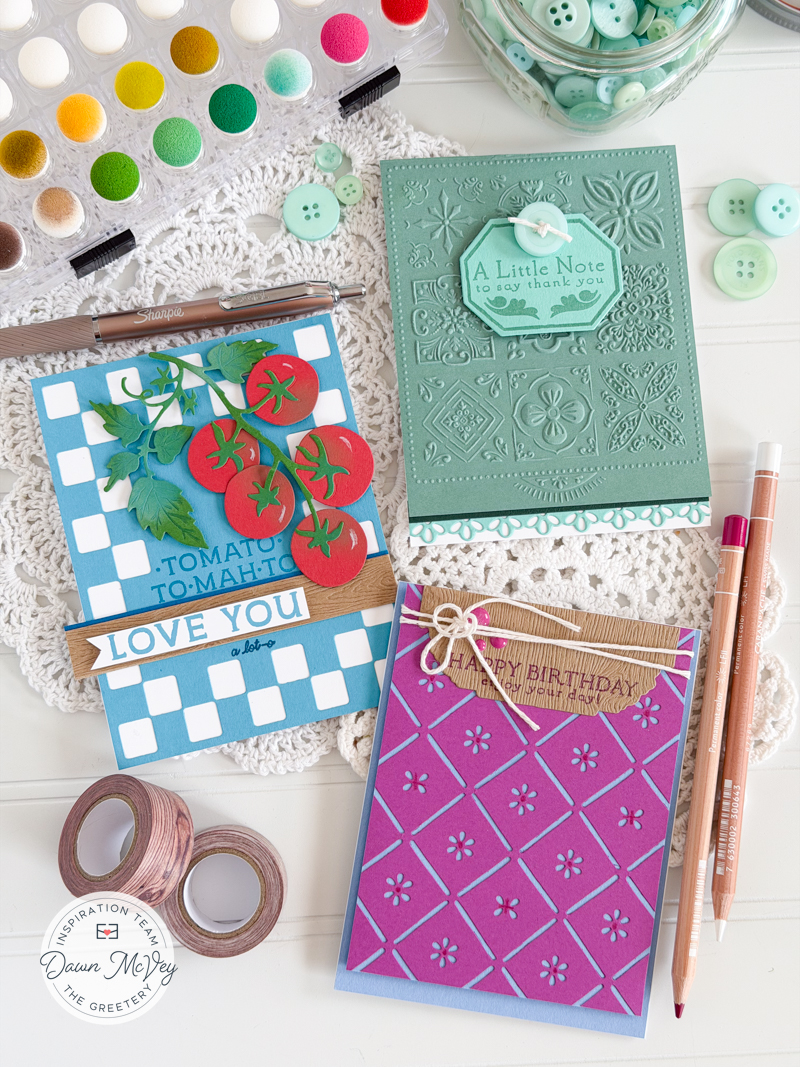
Hello, friends! It’s my turn to share a project for The Greetery, and since I had so much fun with the new goodies from the latest release, La Dolce Vita, I didn’t want to stop crafting! Which means that I’ve got not one but three cards to share! And thanks to the brilliance of so many of the products in the La Dolce Vita collection, you can make some really pretty cards that also just happen to be quick and easy! Gotta love that!
So here’s the scenario…….you just found out last minute, that you’re invited to a party and you’re gonna need a card to go with your gift. Or maybe you’re hosting the party, and since you’ve been doing everything to prep for the party, you haven’t had time to make a card and you need one in a hurry! OR, maybe you had loads of time to get it done, but for whatever reason, you just didn’t do it! LOL! I’ve been there! In all of those scenarios! You?
I recently found myself in one of those situations and needed to whip up a card quickly…..and then it snowballed and one card lead to another and then another! And here we are today! Let’s start off with the most involved card (which is still really quick and easy to make!)!


For this one, I started out by die cutting those tomatoes with the new BotaniCuts Tomato dies and then added a bit of shading with a sponge dauber and ink pads.
PRO TIP: Don’t be afraid to use an unexpected color like a turquoise, for shading on green leaves! The benefit of oxide inks, is that the lighter ink shows up on darker cardstock. The aqua sort of serves as a highlight on the leaves!
I glued the tomatoes and stems together (once you’ve done that a time or two, it goes QUICK, thanks to the little embossed lines on the die cuts, showing you just how/where to place each stem!
I used the new Checks Out die to cut the blue card stock and layered it right on top of the white card base, and then stamped sentiments from Vine Ripened. Lastly, I added some strips of card stock – including a woodgrain strip – and topped that with a hand-cut banner.
PRO TIP: I love that cards like this one are great for guys OR gals!
{Tomato Tomahto supplies — click on thumbnails}


Next up is a VERY quick and easy birthday card, thanks to that Cottage Tile die, which does all the heavy lifting here!
Play with super fun and unexpected color combinations with this die!!! I love the periwinkle and magenta combo!
PRO TIP: To add a little extra detail to the background, I used a colored pencil to add a dot in some of the little flower centers, and a little cross inside the smaller flowers. Such a tiny touch, but you’d be surprised at the added interest it provides!
For the sentiment, I used one of the Ciao Bella Borders dies with some woodgrain card stock. I cut the border die cut in half and added it right along the top edge of the card. A simple twine bow and some enamel dots finished it off!
{Happy Birthday supplies — click on thumbnails}


One last card for today…..again, so quick and simple but so striking in real life!!
For this one, I used the Tin Style embossing folder to create that gorgeous background. I didn’t want to cover it up any more than I had to, so I used the Ciao Bella Borders stamps and an Oblong Octagon Labels die to create the little sentiment label. The verbiage is all from Simply Everyday Sentiments.
Because I wanted to add some additional detail on the card base, I trimmed off the top curved portion of the Tile Suite panel, and then added a strip of card stock along the bottom, along with one of the Pretty Picado Borders die cuts.
PRO TIP: I trimmed off part of that Tin Style panel, and kept the straight edge oriented along the top, since I was adhering it along the top edge of the card. I put the edge of the Tin Style panel with the curved detail still intact, along the bottom of the card, to help draw the eye down to the frilly detail at the bottom.
{A Little Note supplies — click on thumbnails}


I hope you enjoyed these quick & easy cards today and I hope you’ll use the inspiration and make something fun yourself! You could recreate these cards exactly, or play with all sorts of fun color combinations, while still keeping the basic details the same! Or you could just use these as a bit of a jumping off point, and create something completely, uniquely yours! However you do it, I hope you get crafty and have fun!!!
Don’t forget to visit The Greetery Blog today!
Chat with you later, friends!
xo,

Shop my artwork on my website! Follow me on Instagram, Twitter and Pinterest for all the latest updates. Shop my Amazon Storefront and my liketoknow.it page for all my current favorites!
(Affiliates Disclaimer: Just so you know, I sometimes use affiliate links here on my blog, which means that I participate in several affiliate programs, in which I may receive a small commission when you click one of these links and purchase a product at the corresponding product site (usually within a certain amount of time). There are no additional costs for you as a result of these links, but by shopping through these links, you are not only supporting me and the work I do here, but you’re also helping me to continue to bring you beautiful content and inspiration here at my blog, for free! Please know that I share products with you that I use and enjoy and I make every effort to represent those to you honestly. Thanks so much, friends, for your support! I appreciate you!)

2 comments
Wonderful creative cards as usual. You’re such an inspiration.
Great work, Dawn! These are lovely. I esp like the “a little note”…
Lori S in PA
Comments are closed.